Moving over from BridalLive
Bring your vendors, inventory, customers, appointments, open tickets and sales history over with BridalLive's own exports, or ask BridalIQ to do it for you.
The owner does this from Settings, Move over from BridalLive. Nothing in BridalLive changes. You can run it again any time; anything already copied is skipped.
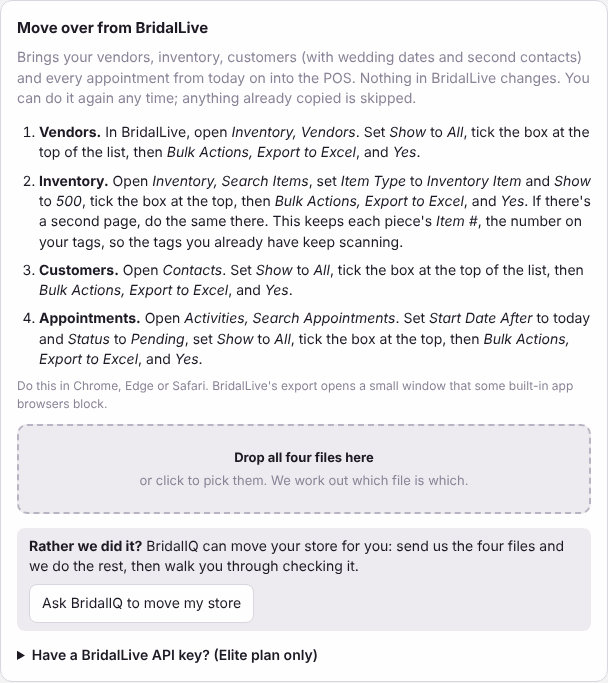
1. Export the files from BridalLive
Sign in to BridalLive yourself in Chrome, Edge or Safari. (BridalLive's export opens a small window that some built-in app browsers block.) For each list, tick the box at the top, then Bulk Actions, Export to Excel, and Yes:
- Vendors: Inventory, Vendors. Set Show to All.
- Inventory: Inventory, Search Items. Set Item Type to Inventory Item and Show to 500. If there is a second page, export it too. This keeps each piece's Item #, so your tags keep scanning.
- Customers: Contacts. Set Show to All.
- Appointments: Activities, Search Appointments. Set Start Date After far back (like 1/1/2020), Status to All and Show to All. Visits ahead are booked here; past visits come over as Completed or No Show (with how it went, when the file says), and nothing is sent for them.
Then the open business, from Reports. Each one: set the filters, Run Report, then Export to Excel:
- Tickets and sales history: Sales Reports, Transaction Journal, and the Transaction Item Journal (the items on each ticket). Set Trx Sts to All (not Pending) and Trx Start Date far back, like 1/1/2020. Open tickets come over as open tickets; closed ones are your sales history.
- Payments: Sales Reports, Payment Journal, with the same settings. Payments come over as they were taken; nobody is charged.
- Waiting for pickup and on order: Inventory Reports, Items Awaiting Pickup and Items On Order.
- Payment plans: Point of Sale, Search Payment Plans, show all, Export to Excel. Each open ticket's schedule goes on its ticket here.
- Closed purchase orders (optional): Inventory, Search Purchase Orders, Status Closed, show all, Export to Excel. For reference only.
2. Drop them into the POS
- Drag all the files onto Drop all the files here, or click it and pick them.
- The POS works out which file is which and matches the columns. If a file says Pick a column for..., press Fix the columns and choose the right column (or Ask AI to match them if it is offered).
- Press Add everything. Vendors go in first, then inventory, customers and appointments, then the open tickets, their items, payments, pieces waiting for pickup and purchase orders. Each file shows how many were added.
- After open tickets, the Open tickets check compares every ticket's total and balance with BridalLive's, to the cent. The Sales history check does the same for closed tickets and shows each year's sales.
3. Check it
- Pieces on hand and the retail and cost totals should match BridalLive's Items On Hand report.
- The customer count should match BridalLive's Contacts list.
- The upcoming appointment count should match Search Appointments (an exact double-booking comes over once).
- The balances due should say match. If a ticket didn't, it gets one "Balance carried over from BridalLive" line so her balance is still right, and the check lists it.
- Pieces waiting for pickup stay your stock, held for the bride, until her ticket is paid in full. Those already paid in full in BridalLive are hers, so pieces on hand go down by them. The open tickets check says how many of each.
- Sales history: the totals should say match, and each year's sales should be close to BridalLive's sales reports for that year (counted on the day each sale counts for your store). A ticket whose shipping or fee lived on the ticket only gets one "Difference from BridalLive's total" line. Tickets with a payment missing from the Payment Journal are listed; they stay closed.
- Look for test records and merge or remove them with Duplicates on the Customers screen.
Payment plans and closed purchase orders
- Payment plans go on the ticket that moved (it still shows "BridalLive L 701"), with each payment's due date and amount and what was already paid. They show on the ticket, on Register, Payment plans, and on her page, and reminders go out from here on. Nothing is charged. A payment already late in BridalLive shows as late but gets no late reminder.
- A plan whose ticket didn't come over is listed under Couldn't match after the import. Bring that ticket's Transaction Journal and drop the plans file again, or set the plan up on the ticket by hand (Payment plans). A ticket that already has a plan here keeps it.
- Closed purchase orders keep BridalLive's PO numbers. They are for looking things up only: not on order, nothing goes into your stock, nothing is received and no bill is made. Find them on Order board, Purchase orders with From BridalLive (closed), or type the PO number in the search box. A PO that came over as on order is never made twice.
- The API key import doesn't bring payment plans or closed purchase orders. Use the two files for these, even with a key.
Rather we did it?
- Press Ask BridalIQ to move my store.
- Tell us anything we should know: the best time to reach you and when you'd like to switch.
- Press Send request. BridalIQ will get in touch to set up a time and tell you which files to send, then walk you through checking the result.
Have a BridalLive API key?
Stores on BridalLive's Elite plan can open Have a BridalLive API key?, enter the Retailer ID and API key (BridalLive, Settings, Account, API Access), and press Connect, then Copy everything now. The key is stored locked and staff never see it.