Getting started: signing in and who can see what
Sign in with a code instead of a password, add your team, and learn what owners, managers, staff and seamstresses can each see.
Sign in
- Go to pos.bridaliq.app on the store computer, iPad or your phone.
- Type your email and press Send sign-in code.
- Open the email from BridalIQ POS and type the 6-digit code. There is no password to remember.
- If you work in more than one store, pick the store under the store name in the left bar. The device remembers the last store you picked.
Add your team
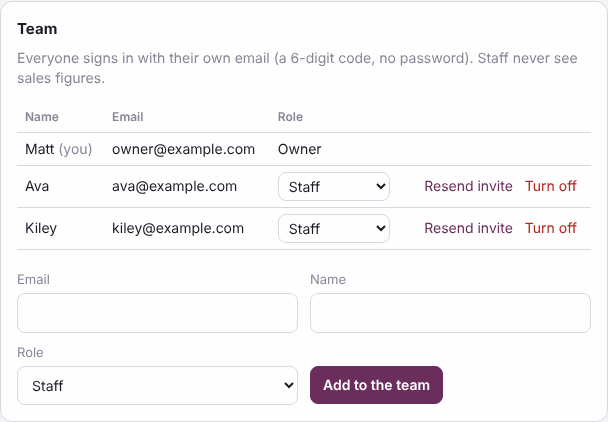
- Open Settings and find the Team card.
- Type the person's email and name, pick a role, and press Add to the team.
- They get an email telling them how to sign in. If it doesn't arrive, press Resend invite.
- When someone leaves, press Turn off. Their history stays, and you can turn them back on any time.
How many people can sign in depends on your plan. Lost a phone? See Signing out everywhere.
The four roles
- Owner: everything. Only an owner can change roles, set up online booking and the client portal, move over from BridalLive, change store details, change the message wording, set commission plans and export all the records.
- Manager: sees money and reports, closes the day, gives refunds and store credit, voids tickets, edits items and stock, and can add staff and seamstresses.
- Staff: books appointments, checks brides in, writes tickets, takes payments, orders and receives, and does alterations and rentals.
- Seamstress: like staff, and on the Alterations board she can tick off work, add fittings and move a job along. She can't start new alterations, change the price list or charge for them.
What staff can't see, and why
Staff never see the store's sales figures. That keeps the store's numbers private, and keeps consultants focused on brides instead of totals. A bride's own ticket and her balance always show at the register, because staff need them to take a payment.
- The Reports tab (sales, commissions, inventory value, sales tax, payments, customer balances).
- What a customer has spent in total. Staff see only what she still owes.
- What an item cost. Staff see the price, never the cost.
- End of day, refunds, voids, exchanges, giving store credit and tax-exempt settings.
- Most Settings cards (team, register, booking, messages, automations, rooms and appointment types).
Find your way around
- Home: today at a glance: appointments, who came in, who purchased, who to call.
- To do: what needs you today: problems to fix, ship dates to watch, orders not placed yet, brides who walked away and brides still deciding. Pick a list under To do in the left menu; each shows how many are waiting.
- The left menu: To do, Schedule, Inventory, Market orders, Order board, Invoices, Tux rentals, Reports and Settings open into their own pages, indented under them. Click the name to open the page you used last (or the first one) and open the list. The little arrow only opens or closes the list. With the keyboard: the up and down arrows move, the right arrow opens a list and steps into it, the left arrow steps back out and closes it, Enter or Space opens. The page you are on is highlighted, the web address names it (so Back and a bookmark work), and your open lists and last pages are remembered for each store on this computer. Register is always in the menu, one click away. On a phone the bottom bar stays; More opens the same menu, where a tap on a name opens or closes its list so you can pick a page.
- Every other tab is one part of the store: Calendar, Customers, Register, Alterations, Tux rentals, Inventory, Order board, Invoices, Reports and Settings.
Your Settings, page by page
Settings is a group in the left menu with eleven pages: Store, Team & roles (you, sign-in, passkeys, desk computers), Appointments & rooms, Register & payment rules, Store policies, Payments & card readers, Messaging & website, Connections (QuickBooks, vendor portals, WedGen, the BridalLive move), Data & exports, Health & backups and Your plan. The cards below are on those pages.
Settings is one page of cards. You see the cards your role can use; each has a small ? beside its name that opens its help page.
- You: your name on the calendar, and Sign out everywhere.
- Team (owners and managers): who signs in and their role.
- Store details: name, logo, phone, email, website, address and time zone. They print on receipts and agreements and show on your booking page. Owners change them.
- Your plan (owners): what your plan includes.
- QuickBooks (owners): whether you use QuickBooks. See Vendor invoices and bills without QuickBooks.
- Store hours, Calendar hours, Blocked rooms, Closed days, Fitting rooms and Appointment types: see Booking appointments and fitting rooms.
- Register: sales tax, the deposit on special orders and layaways, and the agreement customers sign. See Writing a sale and signing the agreement.
- Online booking, Brides change their own appointments and Client portal: see Your online booking page, Brides move or cancel online and The client portal for brides.
- Messages to customers and Automations: see Messages, reminders and automations.
- Texting and Email (owners): see Texting and email (built in).
- Move over from BridalLive (owners): see Moving over from BridalLive.
- Item names: the format new items are named in. See Item names.
- Your stores: if you work in more than one store, pick the one you're working in. Handy on a phone, where the store picker in the left bar is hidden.
- Export everything (owners): download all of the store's records as spreadsheet files in one ZIP: customers, weddings, appointments, items and stock, vendors, tickets, payments, purchase orders, alterations, rentals and the history. It works on every plan, any time.
- History (owners and managers): every change anyone made, who made it, when, and what it was before and after. Nothing is deleted without a trace.
- System health (owners): whether the database, file storage and email are working, the last nightly backup copy, and any problems recorded. A copy of the store's records is saved every night. If something looks wrong here, contact BridalIQ.
Look for the small ? on the busiest screens, or Help at the bottom of the left bar (on a phone, the last button in the bottom bar), to open these pages.
Tasks and repeating checklists
Tasks are on Home, on To do and on the phone's Today screen. Press Add task, say what needs doing, when, and who has it: one person, managers, owners or everyone.
To make it repeat, pick Repeats: every day, weekly on the days you tick, monthly, or every few days, with a last day if you want one. Add a checklist, one item a line, like an opening or closing checklist. Each task starts with the list unticked.
- When one is done, the next one goes on the list right away. On its day it shows up anyway, even if the last one wasn't finished.
- Skip skips this one and the next one comes as usual. A skipped task is kept, marked skipped.
- Repeating lists them all: Change, Pause (no new ones until you restart), or Stop (kept with its tasks, no new ones).